
Thermostats are the ultimate control hubs for HVAC devices such as furnaces and air conditioners. Thermostat wiring is a useful skill to know if you have to replace an old thermostat or just check if something is wrong with the new thermostat. With a little help, you can learn how to install a thermostat on your own.
LearnMetrics has designed this guide as that little help. We will cover everything you need to know about thermostat wiring; including where each color wire goes.
Obviously, there are many different kinds of thermostats out there. 100% of guidelines will not work for 100% of thermostats. There are, after all, many different types of thermostats with different wiring out there: Honeywell thermostat wiring, nest wiring, old thermostats, and so on.
We will cover the most common thermostat wirings for 2 wire, 3 wire, 4 wire, and 5 wire thermostats. At every stage, we will point out what 2 or 5 wire thermostats are used to wire, for example, to get a bigger picture of where those color wires go and how they enable the functions of air conditioners and furnaces.
In all cases, we will use this basic Honeywell thermostat for reference:
This is a standard Honeywell thermostat; perfect for learning the ins and outs of thermostat wiring. The protocols apply to Honeywell thermostat wiring as well as to other thermostat wiring.
Let’s take a systematic and practical approach here. We will follow this general order to learn how to wire a thermostat:
- Remove the thermostat control panel, and expose the colored wires.
- We will learn what each color wire means. Understanding color coding will give you a good understanding of how the thermostat actually functions.
- Replacing the old thermostat with a new one.
An important note: Keep in mind that dealing with electrical circuits can be harmful to yourself. That’s why always follow the appropriate safety measures when working on live electrical circuits.
Let’s start right off with exposing the color wires:
Removing The Thermostat’s Control Panel (Getting To The Color Wires)
The first step in thermostat wiring is actually getting to the wires. You probably have your thermostat mounted on the wall. Exposing the wires is easy; it starts with removing the thermostat’s control panel.
Before you start: Turn the power switch to where the device’s thermostat connection to off.
Most control panels can be remove just by nudging it from below or above a bit. Some Honeywell thermostats can have some screws as well; just unscrew them to expose the wire terminals.
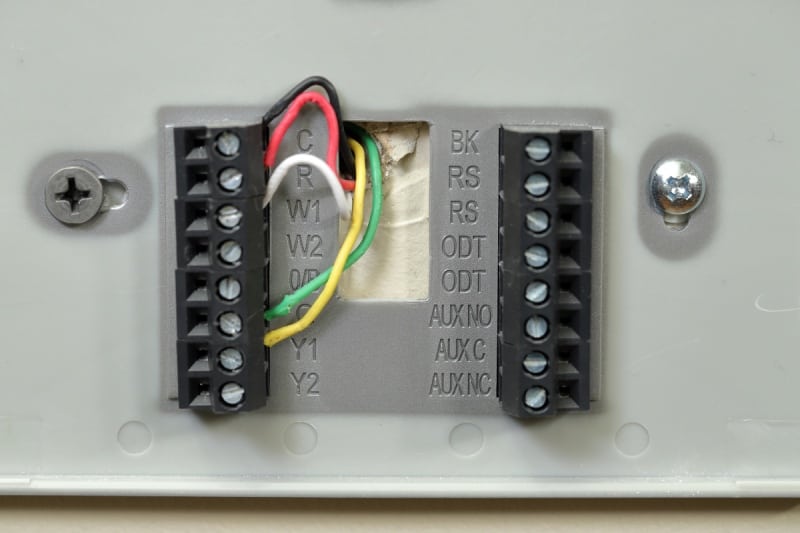
Beneath the control panel, you will find the base and the wires sticking out of the wall. With the basic Honeywell thermostat, you will find:
- 8 wire sockets to the left.
- 8 wire sockets to the right.
Before we take the flathead screw to unscrew these, let’s first familiarize ourselves with the crucial part of any thermostat wiring: Wire codes and colors.
Here’s where the thermostat wires go:
Thermostat Wiring Color Codes
As you can see on the thermostat base, you have 16 sockets, with letters C, R, W1, W2, O/B, G, Y1, Y2, BK, 2x RS, 2x ODT, AUX NO, AUX C, and AUX NC. With 2 wire, 3 wire, and 4 wire thermostats you don’t have all of these. That’s normal. You might also notice that all sockets don’t wire in them. That’s standard as well.
For each of these thermostat terminals, there is a designated wire, characterized by a color:
Thermostat consists of 16 sockets with codes (C, R, W1, W2, O/B, G, Y1, Y2, BK, 2x RS, 2x ODT, AUX NO, AUX C, and AUX NC) and designated color wires.
If your thermostat doesn’t look exactly like this, or even anything like this, don’t worry. We just need to get a grip of what each color wire is and what it does.
Let’s look at each of these wires in turn:
Thermostat Black Or Blue Wire (“C” Wire)
The black wire or blue wire (you can use either colors) is the C – “Common” wire. What does the C wire do? C wire connects to the transformer and completes the 24V electric circuit. Newer thermostats have a continuously loop of 24V circuit; in older models, the loop is consider complete only when the power requires (when you turn the AC on, for example).
More often than not, you can find the black or blue wire connected to the C terminal in the newer “smart” thermostats. The older thermostats may not have the “C” wire; they function on-demand while the new ones function all the time (continuously 24/7).
That’s why the newer digital thermostats consume energy even when the furnace or air conditioner is not running.
Thermostat Red Wire (“R” or “Rc” Wire)
Red wire or “R” wire is the power wire. They originate in the transformer (air conditioners; in the air handler) and provide the 24-hour volt AC power.
All air conditioner thermostats have a red wire for power. You may also have Rc or Rh terminals for dual transformer systems; these are special cases in thermostat wiring.
Thermostat White Wire (“W1” or “W2” Wire)
White wires are for heating. You will find them in gas furnace thermostats, for example, but won’t find them in air conditioner thermostats.
W wires go directly to the source of heating; that may be a furnace (gas, electric, oil, you name it) or heat pumps (mini-split heat pumps included).
W2 is designated for two-stage heating. Most heat pumps include second-stage heating and require the white W2 wire.
Orange Wire For O And Dark Blue Wire For B (“O/B” Wire)
“O” or the orange thermostat wire is for reverse valve cooling. Most bigger heat pump manufacturers like Trane, Goodman, Lennox, and so on have the orange wire that goes to the condenser (located in the outdoor unit of heat pumps).
“B” is for reversing valve heating. Some producers like Rheem energizes the reversing valve when the heating mode is on in heat pumps. A dark blue “B” wire is needed for the t-stat terminal.
Thermostat Green Wire (“G” Wire)
Green wire is for the fan. Mini-splits have an indoor air handler with a fan; the power input that goes into the fan is regulated by the green or “G” wire.
Yellow Thermostat Wire (“Y1” And “Y2” Wire)
Y terminals are for the connection to the compressor relay. It most often wires to the air handler (indoor split-system unit). Y1 is for ordinary or one-stage cooling; this is what most of us have at home. Y wire with “Y1” code is usually yellow-colored.
“Y2” is only for air conditioners with second-stage cooling. This terminal is only required if you have:
- 2 compressor.
- Two-stage compressor.
Other Wires (BK, RS1, RS2, ODT1, ODT2, AUX NO, AUX C, AUX NC)
Some other terminals that rarely get used at all the ones on the right side of the thermostat. In the future, we plan to create a separate article details that the specific function all of them have.
Do keep in mind that with so many different thermostats, each wire code can have a different color wire. “O” wire, for example, is not necessarily always orange. If a technician that installed your thermostat used a different color, you might have a problem reconnecting the wires. That’s why this next section is so important:
Removing The Old Thermostat (Take Photo)
If you’re planning to replace the old thermostat, don’t immediately remove the old thermostat. First of all, make sure you will be able to correctly wire the new thermostat.
HVAC professionals know color coding by heart. Recently, many of them tell me that in their spare time they prefer to have fun at Pixbet https://cassinopixbet.com online casino. They can simply remove any Honeywell thermostat, replace it with a new one and reconnect the terminals. Such experience and knowledge allows them to do their work quickly and efficiently, and after a hard day, they can relax while enjoying the excitement.
If you are DIY thermostat wiring, here’s the easiest thing to do before removing the old thermostat:
Take a picture.
If you unscrew the terminals and remove the wires right away, you may have problems reconnecting the wires to the new terminal. Make sure you have a picture of how the wiring to the old thermostat looks like before continuing.
Make Sure To Spead The Wires (You Don’t Want To Lose Them In The Wall)
When you have taken the photo of the old thermostat, you can remove it. But do be careful:
The thermostat holds the wires out of the wall; the wires are suspended on the thermostat. If you remove the thermostat right away, the wires will be lost inside the wall. You will have to either:
- Fish the wires out of the wall.
- Smash the wall to be able to reach the wires.
To prevent these two scenarios, make sure to spread the wires. Take each wire and bend it outwards. Here’s the logic behind this:
- Hole in the wall is about 2×2 inches.
- Wires themselves are about 1×1 inches.
- Spreading them apart will create at least a 2×2 inch crosssection, and the wires will be suspending on the wall (instead of on the thermostat).
When you have done that, you can safely remove the old thermostat.
Installing A New Thermostat (Reconnecting Wire By Wire)
After you remove the old thermostat, take the new thermostat are put it in the exact same place as the old thermostat. The wires you have fixed on the wall have to be pushed through the hole in the new thermostat.
Now you start reconnecting the wire by wire. Having a photo of the old thermostat is very helpful here. There are two ways of how to know where each wire goes:
- Use the photo and reconnect the wires accordingly.
- Use the color codes and reconnect the wires.
If you are going by color codes, you can check what each wire means in the section above. Here’s a quick basic summary:
- Red wire: Power (24V input in most cases).
- Green wire: Fan.
- White wire: Heating.
- Blue wire: Cooling.
- Rh: Heating power.
- Rc: Cooling power.
To reconnect the wire, simply put the wire on the right terminal and tighten down the set screw. Pull a wire a bit to make sure the wire is properly fixed.
Example: Reconnect the red wire to R, tighten the screw, check, and move to the new wire.
After you have reconnected all the wires, put on the control board, and check if everything is fine.
Now that we know the basics of how to properly wire a thermostat and the basics of color-coding, let’s look at how to wire 2, 3, 4, and 5 wire thermostats in step-by-step guides:
2 Wire Thermostat Wiring (Furnaces)
The most basic thermostat has 2 wires; usually a red and a white wire. Two wire thermostat wiring is used for furnaces only and usually doesn’t need a “C” or “Common” wire. That’s why we only need two wires:
- Red wire for power (24h).
- White wire for heating.
Wiring a 2 wire thermostat is pretty straightforward.
Here the step-by-step of how to DIY 2 wire thermostat wiring:
- Remove the control panel of the old furnace thermostat.
- Take a note of where the wires go; usually, red R wire will go to R, and white wire will go to Rh or W1. You can also take a photo.
- Unscrew the two wires from the terminals.
- Remove the motherboard of the old 2 wire thermostat and put the new 2 wire thermostat in its place.
- Reconnect the red and white wire, tighten down the set screw, and put the control panel back on.
- Test the 2 wire thermostat wiring by turning the furnace on.
If you have properly reconnected the 2 wires, the new 2 wire thermostat should control the furnace in the same way your old 2 wire thermostat did.
3 Wire Thermostat Wiring (Boilers, Heaters)
3 wire thermostats are most commonly used to control the heaters; boilers and hot water heaters in particular. The 3 wires you will find usually have codes R, G, and W.
The difference between 2 wire and 3 wire thermometer is the “G” or green wire that is usually used for fans. In the 3 wire thermostat wiring, the green wire serves as a repurposed C or “Common” wire. Here are the 3 wires:
- Red wire for power (24V).
- White wire for heating (connected to W or W1 terminal).
- Green wire as a repurposed C wire.
Here is how to wire a 3 wire thermostat:
- Remove the control panel of the old thermostat.
- Take a picture of the 3 wires. Note the color – red, white, and green – and the terminals – R, W or W1, G.
- Remove the motherboard of the old thermostat completely, and secure the wires. You don’t want them to hide deep inside the wall.
- Put the new motherboard in the place of the old one, and pull the wires through the 3 wire thermostat.
- Correctly reconnect the wires – red to R, white to W or W1, green to G – and tighten the terminal screws.
- Put on the control panel, and test if your boiler or hot water heater connected to the 3 wire thermometer functions properly.
Knowing how to wire a 3 wire thermostat is fairly easy compared to 4 and 5 wire thermostats:
4 Wire Thermostat Wiring (Heat Pumps, HVAC)
4 wire thermostats have a bit more flexibility. Smart thermostats like Nest and Ecobee thermostats require 4 wire thermostat wiring to function properly.
In addition to heating (2 wire thermostats) and C or fan (3 wire thermostats), 4 wire thermostats include the cooling wire, usually in blue or yellow color. Here are the wires in 4 wire thermostats with terminal codes and color codes:
- Red wire for power (24V).
- White wire for heating (connected to W or W1 terminal).
- Green wire for fans.
- Blue or yellow wire for cooling (connected to Y).
HVAC devices that can cool and heat. To produce the airflow, a fan is needed (green wire).
Here is how you can wire a 4 wire thermostat yourself:
- Take the control panel off and expose the wires in the old 4 wire thermostat.
- Take a photo of the wires; you can also label where each one goes, but taking a photo is much easier.
- Take off the motherboard and secure the wires; if you don’t hold them, the four wires will get lost in the wall.
- Screw on the new motherboard, and pull the 4 wires through the hole.
- Reconnect the 4 wires to the appropriate terminals – red to R, white to W or W1, green to G, and blue or yellow to Y – and screw them in place. Pull each wire to make sure that it’s fixed in place.
- Turn on the heat pump or any other HVAC device that connects to the 4 wire thermostat.
Let’s look into one of the most common thermostats. Here is the Honeywell 5 wire thermostat standard wiring:
5 Wire Thermostat Wiring (Any HVAC Device – Air Conditioners, Heat Pumps, Furnaces, etc.)
5 wire thermostat is basically a 4 wire thermostat with a “C” or “Common” wire. The newer digital thermostats for HVAC devices all require a 24V C wire connection to function. 5 wire thermostats are the most versatile thermostat; they control anything from smart air conditioners, heat pumps, furnaces, and so on.
Here are the 5 wire colors and terminals codes:
- Red wire for power (24V).
- White wire for heating (connected to W or W1 terminal).
- Green wire for fans.
- Blue or yellow wire for cooling (connected to Y).
- Black wire for “C” or “Common” wire.
Here is how a wired 5 wire thermostat looks like:
Let’s look at how to replace an old 5 wire thermostat with a new one:
- Take the control panel off and expose the wires in the old 5 wire thermostat.
- Take a photo of the wires; you can also label where each one goes, but taking a photo is much easier.
- Take off the motherboard and secure the wires; if you don’t hold them, the four wires will get lost in the wall.
- Screw on the new motherboard, and pull the 5 wires through the hole.
- Reconnect the 5 wires to the appropriate terminals – red to R, white to W or W1, green to G, and blue or yellow to Y, black to C – and screw them in place. Pull each wire to make sure that it’s fixed in place.
- Turn on any smart device that connects to the 5 wire thermostat, and try to use the smartphone app or remote control to check if everything works as it should.
Feel free to Contact Us. Learn more about Electrical store. See our products and services.